CLICK IMAGE TO VIEW LARGER PLEASE
I've discovered a fun new way of making "vintage" inspired photos that so far, seems to be very true to actual vintage images. I'm thinking circa 20's, and maybe earlier? I'm an ignoramus when it comes to history, so I could be off.
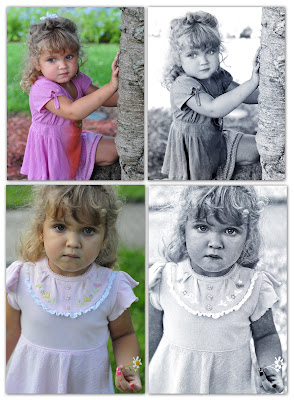
Before I explain the technique, I'll explain my image choice for this treatment.
1. The subject matter is somewhat timeless. (with the exception of her fingernails and maybe her clothing in the first image.)
2. She's got a serious face. Many earlier photos are non-smiling subjects. I think it has to do with the slow exposure or maybe the myth that smiling in photos made people appear insane?
I use Photoshop CS4, but I think many of these steps could be duplicated in earlier versions. All of these steps are very general and should be toyed with to your liking.
1. After you've chosen your image, make a layer copy and set the blending mode to "screen."
2. Create a new adjustment layer using Channel Mixer.
3. Set it to Black and White Infrared
4. You should see instant drama. But it will make all the reds - especially skin tones, appear blotchy and unattractive. Here's how to fix that:
5. Create a new blank layer, just under the channel mixer adjustment mask.
6. Select a paintbrush with soft edge to the size you need. For a subtle way to "paint" out and make those skin tones soft and get silky, smooth skin, set your brush to the following. Color = 7fa15e (a kind of olive green.) Set your brush blending mode to soft light, and turn down the opacity and flow somewhere around 25%.
7. Use your brush on that layer to paint the skin and other problem areas. If you go too far, you can just use the eraser tool to tone it down.
8. Finally, select a vintage type texture to apply to the top layer. I happened to use Florabella textures, but there are plenty of free ones out there. For a "warm effect" simply set it to soft light blending effect and you are finished. For these images, I chose a warm texture, but wanted to cool the images a bit so I did "adjust/invert" to the texture to get the bluish tone.
So there you have it!
I know I could go into a LOT more detail with this tutorial, and if you are stuck and don't understand my instructions, feel free to email me. emily@squeeekphoto.com In the future as I find more time, I'll do a lot more detail-intensive tutorials.
Have fun!


